How to Gaming PC Build: A Practical Step-by-Step Guide
Building a gaming PC can be intimidating the first time, but with a systematic approach you can assemble a powerful, reliable system tailored to your budget and goals. This guide walks you through how to gaming PC build: choosing parts, prepping your workspace, assembly, software setup, and tuning for performance and stability.
Table of Contents
- Why build a gaming PC?
- Plan and pick your parts
- Tools, workspace, and safety
- Step-by-step assembly
- BIOS, drivers, and first boot
- Optimization and maintenance
- Product recommendations & comparison
- FAQs
- Conclusion
Why build a gaming PC?
Building a gaming PC gives you control over component quality, cooling, upgrade paths, and cost-efficiency. Compared to buying a prebuilt, a DIY build can be better tailored to your performance needs and future-proofing goals. For beginners who prefer not to build from scratch, we also list reliable prebuilt systems below.
Plan and pick your parts
Before buying, decide your priorities: high-frame-rate 1080p, 1440p ultrawide, or 4K gaming? That determines the GPU and CPU tier you need. Here are the essential components and what to consider:
Core components
- CPU — Choose a processor that complements your GPU. For gaming, a modern multi-core CPU with strong single-thread performance is ideal.
- GPU — The most important for gaming. Match GPU to your target resolution and refresh rate.
- Motherboard — Ensure socket compatibility and the features you need (M.2 slots, PCIe lanes, USB ports).
- RAM — 16GB is the current baseline for gaming; 32GB for high-end streaming or heavy multitasking.
- Storage — NVMe SSDs offer the best load times; consider 1TB+ for modern game libraries.
- PSU — High-quality power supply with sufficient wattage and an 80+ efficiency rating.
- Case and cooling — Good airflow matters. Choose a case with space for your GPU and adequate fan mounts.
Budget considerations
- Allocate the most budget to GPU first for gaming performance.
- Balance CPU and GPU to avoid bottlenecks.
- Buy a reliable PSU — it protects your investment.
Tools, workspace, and safety
Prepare a clean, static-free workspace and gather these tools:
- Magnetic screwdriver set (Phillips)
- Anti-static wrist strap or frequent grounding
- Cable ties and scissors
- Thermal paste (if CPU cooler requires it)
- Soft flashlight for tight spaces
Safety tips:
- Work on a non-conductive surface.
- Ground yourself before touching components.
- Keep small screws organized.
Step-by-step assembly
This section explains the typical order for a clean build. Follow the manual for your specific motherboard and case where needed.
1. Install the CPU
- Open the motherboard CPU socket, align the CPU according to the marker, and gently seat it without forcing.
- Close the socket latch.
2. Install CPU cooler
- Apply thermal paste if not pre-applied (pea-sized dot), mount the cooler, and tighten evenly.
3. Install RAM
- Insert RAM sticks into recommended slots for dual-channel performance; press until the latches click.
4. Mount motherboard in case
- Install standoffs in the case, lower the motherboard onto them, and secure with screws.
5. Install storage and GPU
- Mount NVMe SSD in M.2 slot or secure a SATA SSD/HDD in drive bays.
- Insert GPU into the primary PCIe x16 slot and fasten with screws to the case.
6. Connect power and front panel
- Connect 24-pin ATX and CPU 8-pin (or 4+4) power connectors from PSU to motherboard.
- Hook GPU power cables (6/8-pin) from PSU to GPU as required.
- Attach front-panel wires (power switch, USB, audio) per the motherboard manual.
7. Cable management and final checks
- Tidy cables with ties for airflow and avoid blocking fans.
- Double-check all screws, connectors, and RAM seating.
BIOS, drivers, and first boot
First power-on steps:
- Enter BIOS/UEFI and confirm RAM XMP/DOCP profile if you want rated RAM speeds.
- Check storage detection and boot order.
- Update BIOS if necessary (follow manufacturer instructions carefully).
- Install Windows or your preferred OS and then the latest chipset, GPU, and peripheral drivers from vendor websites.
Optimization and maintenance
Performance tuning
- Install GPU drivers and use the driver control panel to set performance vs quality presets.
- Monitor temps with reliable tools and adjust fan curves for quiet cooling under load.
- Keep OS and drivers up to date for stability and security.
Maintenance
- Clean dust filters and fans every 3–6 months.
- Reseat cables and check thermal paste every few years if temps rise significantly.
Affiliate disclosure and product recommendations
Affiliate disclosure: This article contains affiliate links. If you click an affiliate link and buy a product, I may earn a commission at no extra cost to you. I only recommend products I trust or that match the use cases described.
Who these recommended systems are for
- Prebuilt options are for users who prefer plug-and-play or want warranty support out of the box.
- Pick a prebuilt with the CPU/GPU balance that suits your gaming resolution and streaming needs.
Top prebuilt picks (quick)
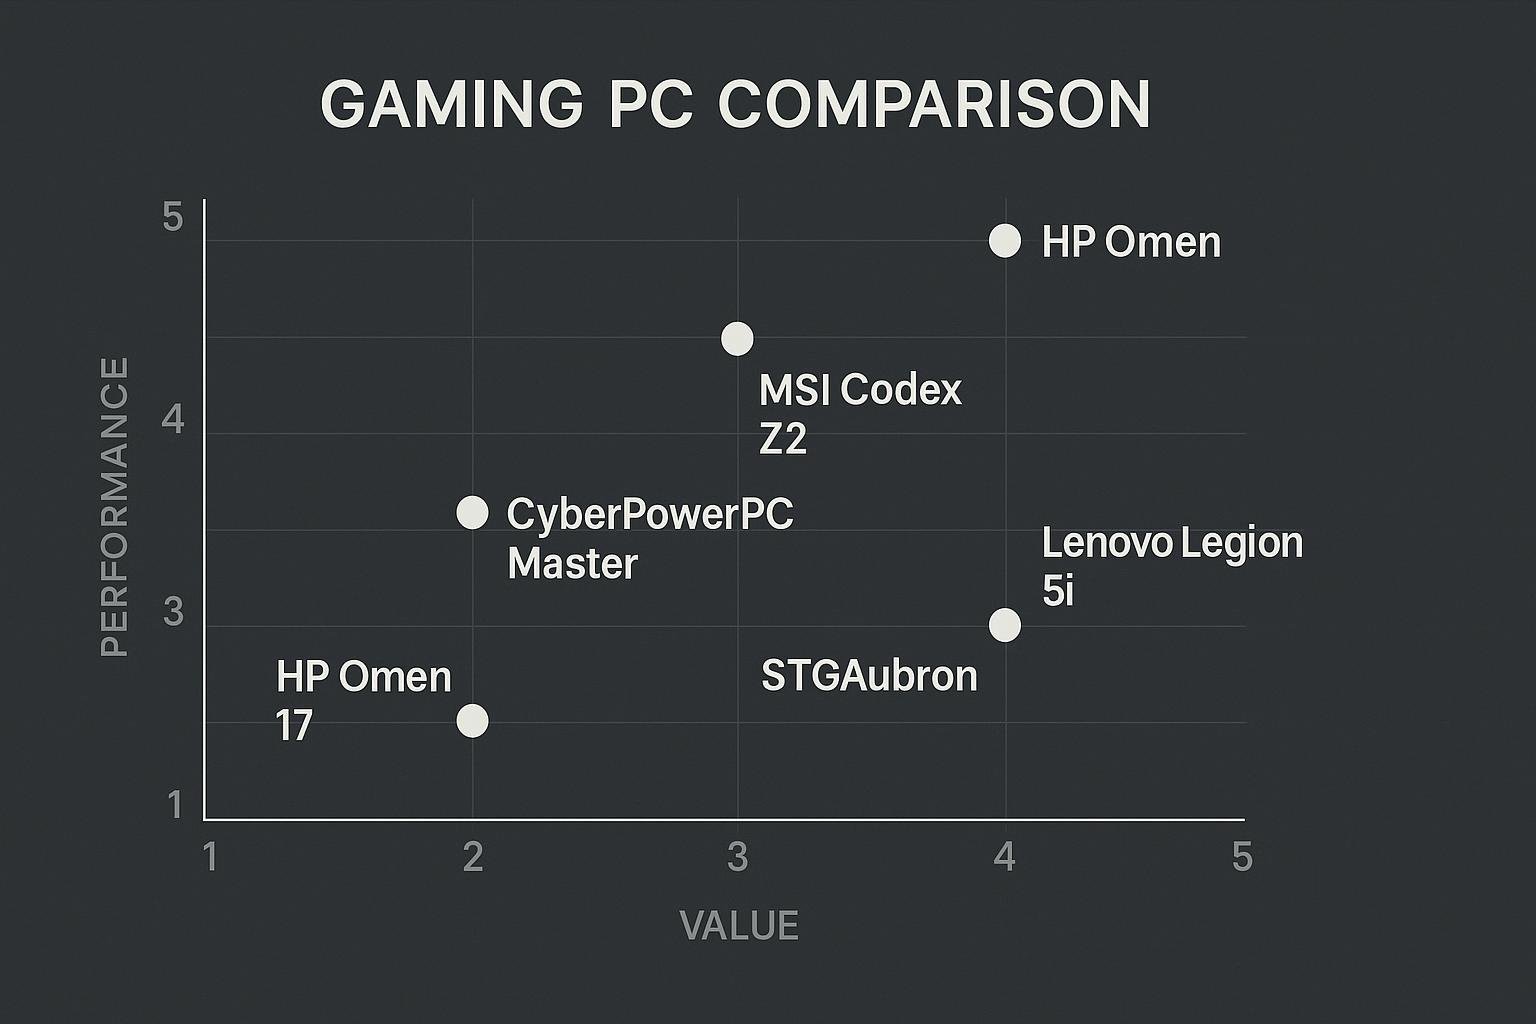
- msi Codex Z2 Gaming Desktop: AMD R7-8700F, GeForce RTX 5070, 32GB DDR5, 2TB m.2 NVMe SSD, Windows 11 Home – Great for high-refresh 1440p gaming and multitasking with 32GB RAM.
- CyberPowerPC Gamer Master Gaming PC: AMD Ryzen 7 8700F, GeForce RTX 5060 Ti, 16GB DDR5, 1TB PCIe 4.0 SSD – Balanced mid- to high-end performance for gamers on a value point.
- Cooler Master TD5 Pro Gaming PC – AMD RYZEN 7 9800X3D, NVIDIA GeForce RTX 5090, 32GB DDR5, 2TB Gen4 M.2 – Top-tier hardware for maximum frame rates and heavy streaming/editing workloads.
- Lenovo Legion Tower 5i Gen 10: Intel Ultra 7 265F, NVIDIA GeForce RTX 5070, 32GB DDR5, 2TB PCIe SSD – A reliable option with strong CPU core counts for productivity and gaming.
Comparison table
| Model | CPU | GPU | RAM | Storage | Best for | Link |
|---|---|---|---|---|---|---|
| msi Codex Z2 | AMD R7-8700F | GeForce RTX 5070 | 32GB DDR5 | 2TB m.2 NVMe SSD | High-refresh 1440p, multitasking | Buy on Amazon |
| CyberPowerPC Gamer Master | AMD Ryzen 7 8700F | GeForce RTX 5060 Ti | 16GB DDR5 | 1TB PCIe 4.0 SSD | Mid-to-high gaming value | Buy on Amazon |
| Cooler Master TD5 Pro | AMD RYZEN 7 9800X3D | NVIDIA GeForce RTX 5090 | 32GB DDR5 | 2TB Gen4 M.2 | Top-tier performance and streaming | Buy on Amazon |
| Lenovo Legion Tower 5i | Intel Ultra 7 265F | NVIDIA GeForce RTX 5070 | 32GB DDR5 | 2 TB PCIe SSD | Balanced performance + productivity | Buy on Amazon |
Frequently Asked Questions
1. Is building a gaming PC cheaper than buying prebuilt?
Often yes if you shop components smartly and reuse parts like storage or a power supply. Prebuilts can offer convenience and warranty coverage, so the best choice depends on your comfort with assembly and need for immediate support.
2. What components should I never skimp on?
Power supply quality and GPU (for gaming) are the two parts you should prioritize. A reliable PSU protects your system and a good GPU delivers playable frame rates.
3. How much RAM do I need for gaming?
16GB is the current baseline for most gamers. If you stream or run memory-heavy applications, 32GB is recommended.
4. Do I need an NVMe SSD?
NVMe SSDs provide much faster load times than SATA SSDs. For the OS and games, NVMe is recommended, though you can use a SATA SSD for additional cheaper storage.
5. How do I troubleshoot a system that won’t POST?
Check power connections, reseat RAM and GPU, clear CMOS per the motherboard manual, and remove non-essential components to isolate the issue.
6. Can I upgrade a prebuilt system?
Most prebuilts allow upgrades to RAM, storage, GPU, and sometimes the PSU and cooling. Check case clearance and PSU connectors before buying upgrades.
Conclusion
Learning how to gaming PC build gives you control over performance, longevity, and value. Start by choosing parts that match your gaming goals, prepare a safe workspace, follow the assembly order, and finish with BIOS and driver setup. If you prefer not to build, the prebuilt options listed above offer strong performance at various price points. Whatever path you take, plan for airflow, quality power, and an upgrade path, and you’ll have a great gaming experience for years.
Visual Buying Guide